

Cinec, the people who brought ProRes encoding to your PC had just released what might well be the Holy Grail of Encoders. Cinec 4.0 is more than just an encoder… it is a micro edit suite.

Here’s what you can convert :
- H.265 (both the original and the newer Version 3 in RQ, SQ, HQ quality)
- VP9
- ProRes ( 422Proxy, 422LT,422,422HQ & 4444)
- Avid DNxHD (36M, 60M, 90M, 100M, 145M, 175 M, 185M, 200M)
- XDCAM_HD_50M
- H264 (Proxy, Base, HQ, H422, H444)
- RAW VIDEO
- Quicktime Animation
- IMX30 (MOV, MXF)
Add to that, you can customize your settings to your exact liking. Cinec even allows for Colormatrix Conversions. Change your standards settings from 601 to 709 or 709 to 601. SMPTE240M to 709 or 601. Even FCC to 601 or 709.
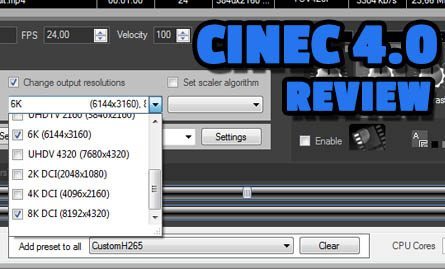
Need to upscale or downscale? Cinec 4.0 offers:
- NTSC 720×480
- PAL 720×576
- HDTV 1280×720 or 1366×720
- FullHD 1920×1080
- 2K 2048×1080
- 4K DCI 4096×2160 or UltraHD 3840×2160
And if that isn’t enough go 6K 6144×3160, 7K UHDV 7680×4320 or an amazing 8K DCI a whopping 8192×4320.
Honestly, I haven’t had time to try all of the resolutions Cinec 4.0 has the offer. When you’re deciding you can you let ‘Centre’ choose the scaler algorithm or you can choose it from a list of 12 varieties. For test purposes I like Cinec choose the algorithm and the results were awesome.

Want to add a text overlay? This is an exciting feature for me as I can use it to create “screener copy only” version videos of my work without having to go back into my NLE software. You can also add a picture overlay. This makes adding a logo in the corner a snap.

Want to add a LUT to create a variation on your original video? It’s got it.
Want to Cut, Crop or Split your video, it’s covered.
How about trimming for just one scene? Yes, you can do that too.
You can even overcrank or undercrank and change frame rates.
Last but certainly not least change and adjust the Gamma, Brightness, Contrast and Saturation with the built-in controls.
So now I’ve told you about what you can do. Now let’s quickly go over how to create an H.265 conversion.
To start, I used the trailer for my upcoming release, “Ancient Angkor 4K”, filmed entirely with the Panasonic Lumix GH4.

You can either drag and drop the file in or click file and the drop-down box appears for adding a file. Once that’s done select the H265v3C_HEVC quality choice, either SQ,RQ or HQ. You can even choose additional quality selections and Cinec 4.0 will create one after the other.
I chose to trim for 20 second test convert by just selecting my start and end position. You can use the slider or you can insert frame numbers.
The last thing I did was to set where I wanted my output file to go.
In my case I am using the gold version of Cinec 4.0 so I get to choose how many CPU cores I want to use.with my new Intel 5960 X CPU I was able to use all eight cores (16 hyper thread cores).
Converting times will vary depending upon your PC. On mine it was lightning quick.
For HEVC playback I used POT Player downloaded from www.potplayer.daum.net
BUY CINEC 4.0 Packages today! Terms and Conditions apply.*
To download and view our test results for yourself, SUBSCRIBE below and get the videos for FREE!
[lab_subscriber_download_form download_id=1]
I am photographer