
This episode really gets into Solo owners videos.
For Episode Three of our Life After Gravity miniseries — shot entirely on Solo; — we branched out in terms both of creativity and crew, for the first time primarily incorporating amazing shots submitted by everyday users from around the Solo universe. From the beginning we intended the LAG series to be a crowdsourced film, but the response has been more enthusiastic and the volume more, well, voluminous, than we anticipated: Before we’d ever made the public call for submissions we were getting hit with amazing shots from Solo users; many of these shots we were able to work into this episode.
Details after the break.
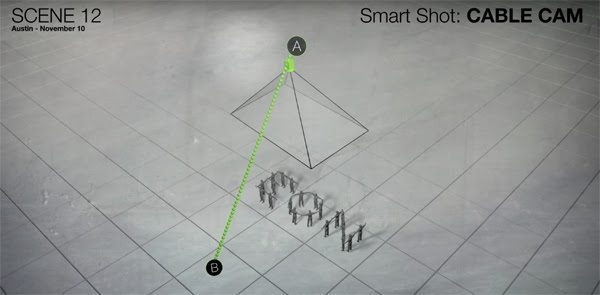
Gerard submitted this great Orbit shot totally unprompted just a few days after Episode One debuted. He’d been struck by the LAG premise, shooting an entire series only on Solo, and on a drive through Texas he noticed an unusual building just off the highway he thought would make a great EON building. He was right about that — the geodesic-patterned dome immediately imprints as a biosphere. Gerard immediately pulled off the road, popped up his Solo and grabbed a killer dynamic and spiraling Orbit that exploits the way the sunlight strikes and leaps across the triangular facets of the dome’s roof. (The building is the Bell County Expo Center, in Belton, Texas.) He posted the shot to Facebook and tagged it as an EON building, and it was obviously too great to pass up.
You’ll see these dynamic Orbits used throughout the series; it’s become one of our favorite establishing shots. Here’s how to do what Gerard did.
- Choose the “Orbit” Smart Shot, and then take your time setting the frame for your Orbit’s center point.
- When you’ve got the camera centered exactly where you want it, press the A button and lock it in. Now Solo will keep the camera on that point for as long as you’re orbiting.
- Get your camera in super tight on the center.
- Solo’s Orbit allows you to play with both altitude and radius in real time while the computer pans and tilts so the camera stays on your center point no matter what.
- To decrease your radius, use the right stick on the controller to bring Solo in as close as you want it.
- For this shot Gerard took his radius down to practically zero, so at the start he had the camera looking nearly straight down at his center point.
- Using the app screen, choose the direction you want Solo to fly and hit “play.” Solo automatically starts its Orbit.
- When you’re flying an Orbit this close to your center point you’ll have a really small radius, which means a high angular velocity — Solo will make a full revolution around the center really quickly and your shot will spin fast.
- Use the right stick to extend your radius, pulling Solo’s Orbit away from the center at the speed you want. Solo will automatically adjust camera tilt to keep the shot centered as you go back.
- The further you get from your center point, the more you reduce your angular velocity. You’ll notice that as Gerard pulls Solo out, the spin of the shot slows. This nicely articulates the dramatic feeling he’s going for in this spiraling reveal.
- As you pull away, you can simultaneously adjust the altitude of your Orbit. Here Gerard both expands the radius and slightly increases altitude as he goes, both of them moves that make the shot wider.
THE CLIFF MAN — ADAM GUY
Ask any cinema pilot — when you’re flying manually it’s exceedingly difficult to get a drone to nail its mark as you’re bringing it to a stop. A few reasons for this, mostly relating to our fumbly thumbs. It’s tough to adjust immediately and in perfect scale to a sudden environmental change, like the addition or subtraction of wind. Also, without running through the shot a few times to find the speed you want for the move, you’ll likely undershoot or overshoot the move (as originally happened here, actually). Then add to this witch’s brew the smoothness of your flight, the camera tilt, the actor and/or action, time and light constraints, synchronicity (both planned and acausal) and battery life, and you can see why truly great cinema pilots are in high demand.
Solo, with one computer, just about completely removes all of that variability. This shot is a great example. (So great that we included it in the behind-the-scenes video above — it was grabbed during a LAG shoot — but it doesn’t feature in this episode.)
Adam Guy, an enviably gifted professional cinematographer, first tried to get this shot manually, flying over the actor, tilting the camera and coming to rest on a final mark just beyond the actor’s last grasp over the cliff’s edge. He got the move down, but overshot the final mark. Instead of running through the shot a few more times to get the speed perfect, Adam just decided to use Cable cam. He just stayed there and hit a button to set the end frame, then set the first, pressed “play” and let Solo do with one tap and in one take what may have taken him another two or three (or one — Guy’s pretty good).
In other words, Smart Shots don’t just make it easy to create and capture perfect shots; they also serve a practical purpose by removing human variability. Weirdly this actually makes your shots even more human, because it frees you to be more creative, as well as allowing you to turn your attention to the actors and the scene.
Here’s how he did it.
- Fly the shot manually—coasting over your subject and gliding to a stop while you tilt the camera down to nadir position.
- Overshoot the mark.
- Don’t be cavalier about it and return to your “one” for take two. Instead, open Cable cam and take a few seconds to get that last frame perfect right where you are. Hit A when you’re ready and lock in that frame.
- Now fly back to your “one” and do the same — get the frame just how you want it and hit A to set it.
- Now Solo’s on a virtual cable and you’re ready for take two.
- Also, you now have options: Smart Shots aren’t an all-or-nothing setup; it’s not a choice between fully automatic and fully manual. Solo’s computer is flexible and agreeable, presenting you with a smorgasbord of automation layers — it can be a no-pilot system, of course, but it can also be a virtual two-pilot system.
- Option 1: Use the controller to manage Solo’s speed and direction on the cable while Solo automatically interpolates the camera movement between your two frames. You’ve got your end frames set, so Solo won’t let you overshoot the mark.
- Option 2: Press “play” and let Solo fly from frame to frame at the speed you tell it to, automatically easing to a stop and nailing that final mark, while you manually control the camera’s angle and pan with the sticks and tilt paddles.
- Option 3: You know exactly the flight path you’re on, so you can even manually control Solo’s speed and direction while it keeps itself locked onto this track, while you’re also free to work camera tilt and direction. This allows you to retain even more manual control of flight and camera work, if you want it.
- Option 4: Press “play.” Have a lemonade. Aaaand, scene.
EON EMPLOYEES
If corporations are people, what about that little problem of being faceless? Well, the greatest faceless companies have faces. In this video we really wanted to emulate the “turn-and-smile” corporate cliche and ironically underestimate the intelligence of our audience. (Further irony: Many are real 3DR employees.)
These shots were pretty fun, and shooting with Solo, in all seriousness, actually made them all the more enjoyable. As in the above Cliff Man shot, we used Cable cam to establish firm start and end frames. This helped in two ways. One, we could confidently fly the camera in pretty tight on our actors, knowing exactly where Solo would stop; GoPro control came in handy here, as we realized we could swap to shooting in 2.7k in medium, which meant we could punch in even further in post-production for a tighter shot in 1080. Also, once we had the move down that we wanted, we wouldn’t have to fly it perfectly every take; Solo would take care of that, removing the technical variability of camerawork from the equation, letting us focus on the actors.
Now we just had to tap “play” and let Solo fly the cables for as many takes as we needed or wanted. We could work with the actors to try all sorts of different feels and then find the one that synched up best in editing.
How-to:
- Work with your actor to establish their mark and the general move.
- With your actor at their “one,” fly Solo to the first frame and take your time to set it exactly how you want it. Hit A to lock it in.
- Have your actor go through the move to the end; fly Solo to the end frame and make sure you have the framing just how you want it. Hit A again and your cable is set.
- If you’re flying in tight to your actors, as we were here, you can and should use Cable cam’s flexible setup to take as much time as you need to assure your framing is 100% safe — especially if you’re working with a kid!
- Tap “play” and Solo will fly the identical move from first frame to last as many times as you want or need it to, letting you work with your actors to get the performance — or the array of performances — that you want.
- Pro tip: With Solo’s GoPro control, you’re able to change your field of view and resolution right from the Solo app. Select 2.7k resolution and you’ll have the further option to select a medium field of view, which puts you tighter than wide. Then in post you’ll have the extra pixels you need to punch in even further while retaining the high-resolution look at 1080p.
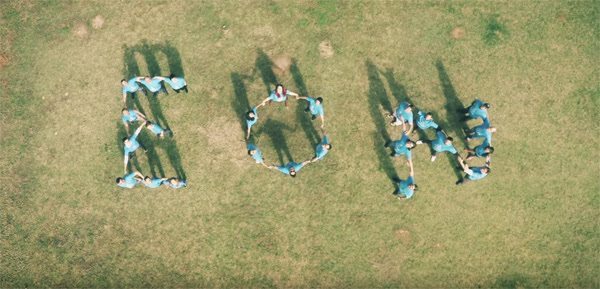
EON EMPLOYEES PART DEUX
I’ve personally always found aerials particularly impressive as a supplemental perspective. When you combine an aerial with a traditional ground-level shot of the same place or scene, the contrast of the two, bouncing one image immediately off the other, is pronounced and compelling. The shot of the EON employees arranged on the lawn to spell “EON” is a clear example. As the camera executes the Cable cam from the ground up, a group of people standing around outside transforms into a word on a solid green backdrop. Combine this with the ability to time your actors to Solo’s automated move, and you’ve got a cool shot you can grab during a lunch break. As we did with this one.
- Ply your co-workers with free t-shirts into giving up their lunch break.
- Position your actors or elements in the scene; give instructions as needed.
- Select Cable cam, then set your first, ground-level frame by hitting the A button.
- Fly up above the scene, tilting camera accordingly and directing actors as needed.
- When you find your end frame, take your time to set it, then hit A to lock it in.
- Tap “play” and Solo will smoothly and automatically repeat the move from beginning to end until you get even the most amateur and camera-shy of your co-workers/actors perfectly choreographed.
Thanks to all of our outside contributors!
Gerard Juarez
Adam Guy
Craig Coker
Sean Newhouse
Max Seigal
Brian Grubb
Nuria Goma
Jake Chamseddine
Bryan Daugherty
…And the new internal contributors!
Bradford King
Nick Speal
Luke Holoubek