


Did you know that you can “Cast” your Pico Neo 2 Eye to your Samsung TV* or many Miracast devices? Even your Lexus in-car multimedia device can be cast to? How about being able to turn off sleep mode? Any idea what the best framerate and Mbps encoding rate is? I’m going to show you Secrets Behind Pico Neo 2 Eye-Encoding, Shortcut Keys & More!
All the answers are below in an exclusive look at all the info that you could possibly want to know about the Pico Neo 2 Eye and how to make it even better than it already is!

These settings apply to the Pico devices: Pico Goblin, Pico G2, Pico G2 4K, Pico Neo, Pico Neo2, and Neo 2 Eye. Bookmark this page for easy reference or look for it on the FREE IMMERSIVE UNIVERSITY page. And keep watching I’ll be reviewing the Pico G2 soon.
PicoVR FAQv_1.3.0
- 1 Introduction
- 2 FAQ
- Q1: How to access Developer Options?
- Q2: How to enable USB Debugging?
- Q3: Frequently used shortcut keys.
- Q4: What is recommended Video Encoding Formats?
- Q5: How to enter recovery mode?
- Q6: How to do factory reset?
- Q7: How to mitigate Chromatic Aberration?
- Q8: How to reset orientation only horizontally?
- Q9: How to upgrade system via SD card?
- Q10: How to cast screen to a TV/TV box?
- Q11: How to format SD card as internal storage?
- Q12: How to turn off sleep mode?
- Q13: How to mitigate HMD overheating?
- Q14: How to sign apk with Pico system signature?
2 FAQ
Q1: How to access Developer Options?
A:
G2/G2 4K/G2 4KS/G2 4KE:
Press “Confirm” and “Volume Down” button to enter 2D Settings – “System” – “Developer Options”
Goblin & Neo:
1. Press “Confirm” and “Volume Down” button together to go into 2D Setting menu.
2. In this 2D menu, select “About Device”, and click PUI Version 8 times.
3. Go back to the main 2D menu and you should now see Developer Options appear at the bottom under System.
Neo2/Neo2 Eye:
1. Press “Confirm” and “Volume Down” button together to go into 2D Setting menu, and find “System” at the bottom.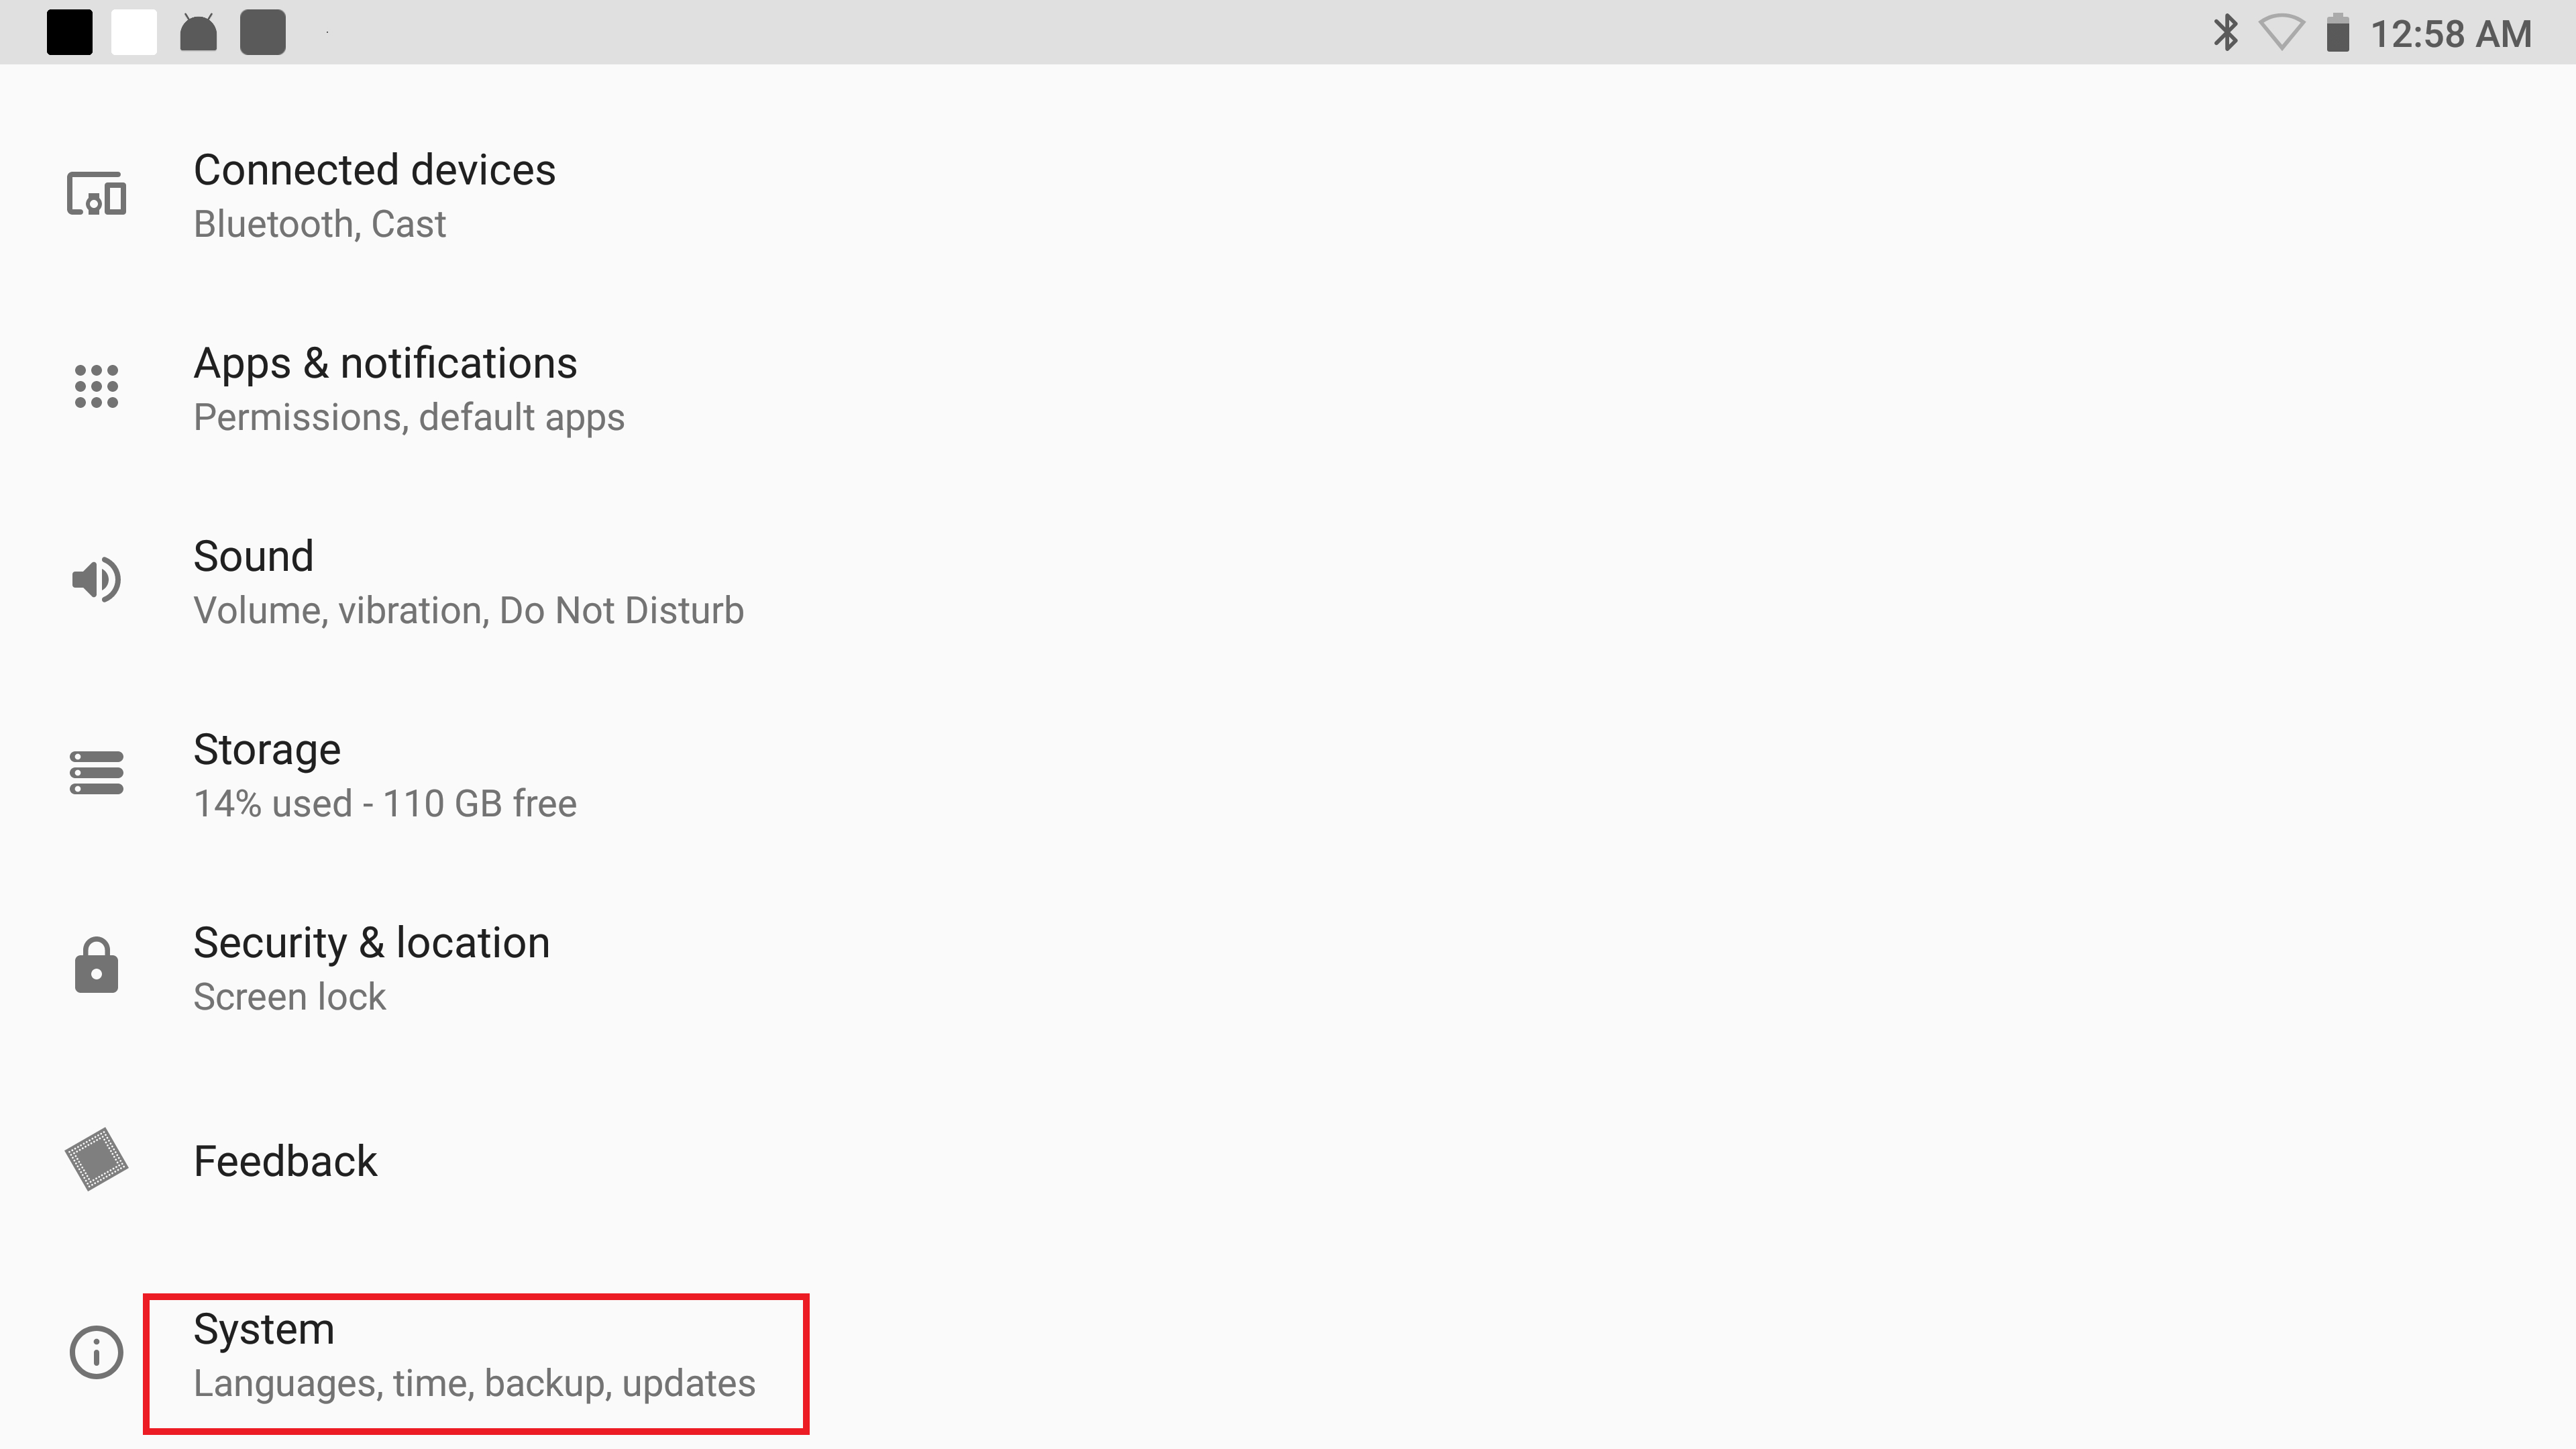
2. In “System”, click“About device”.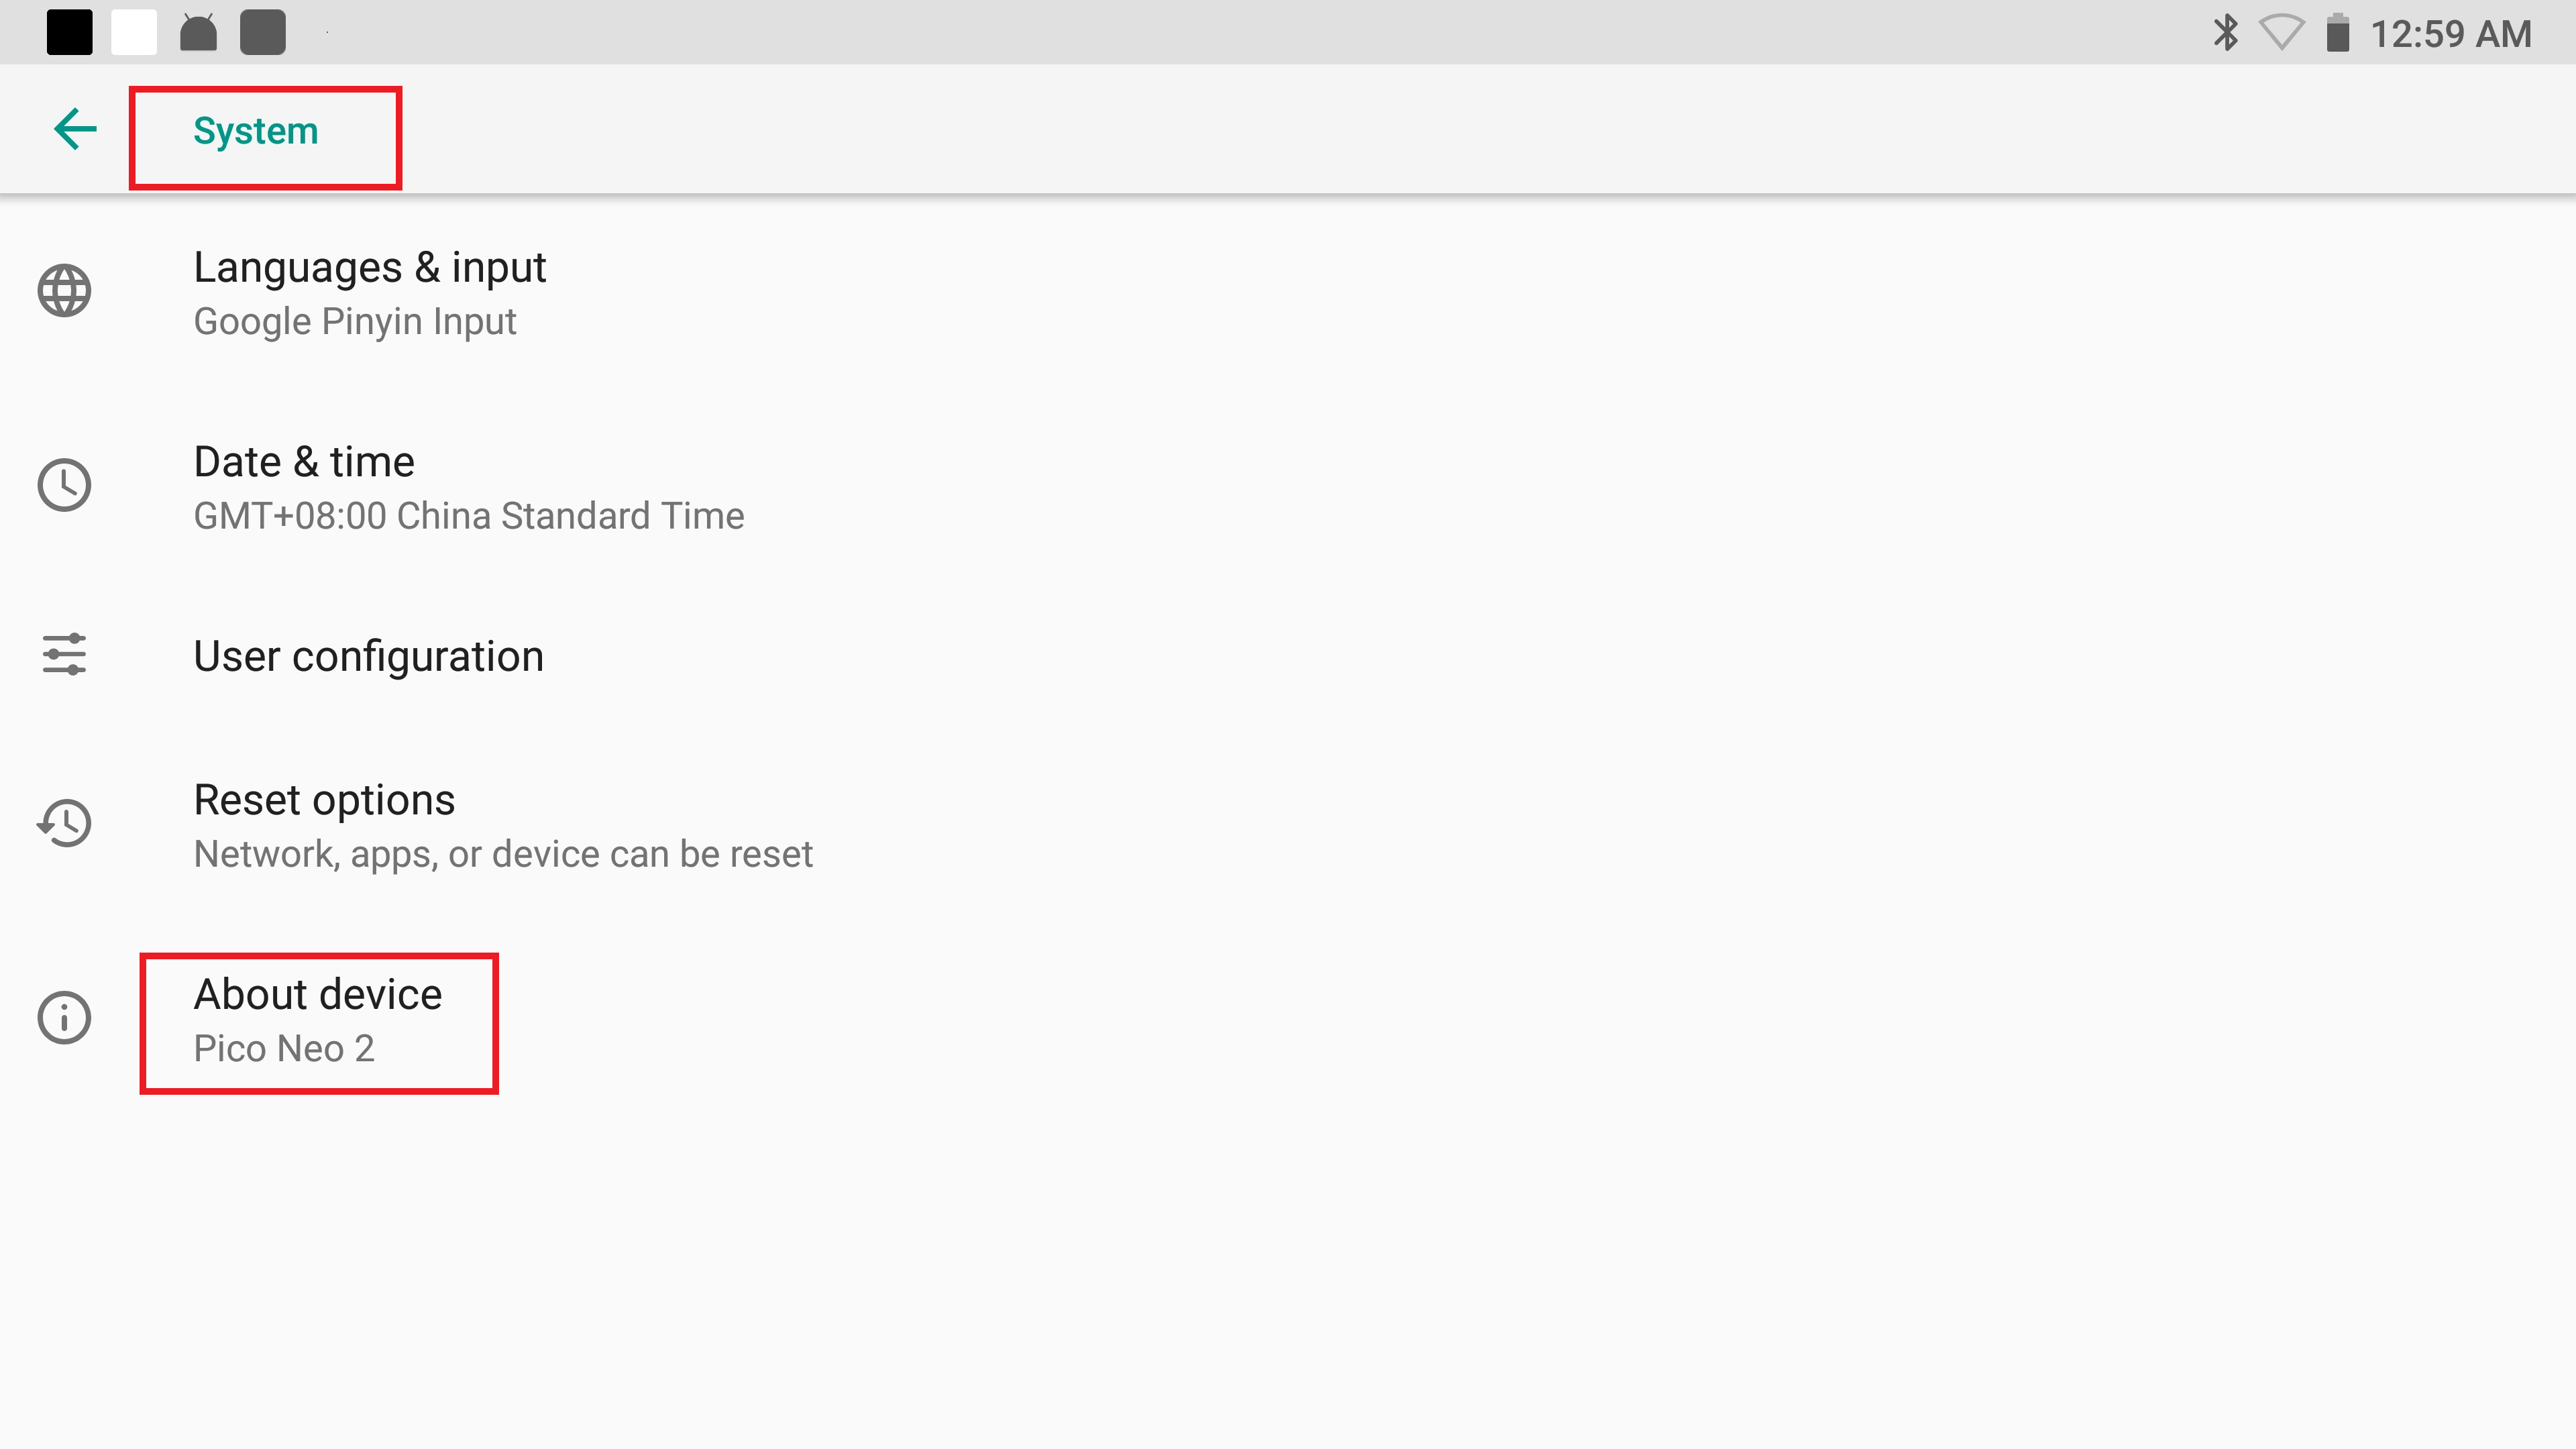
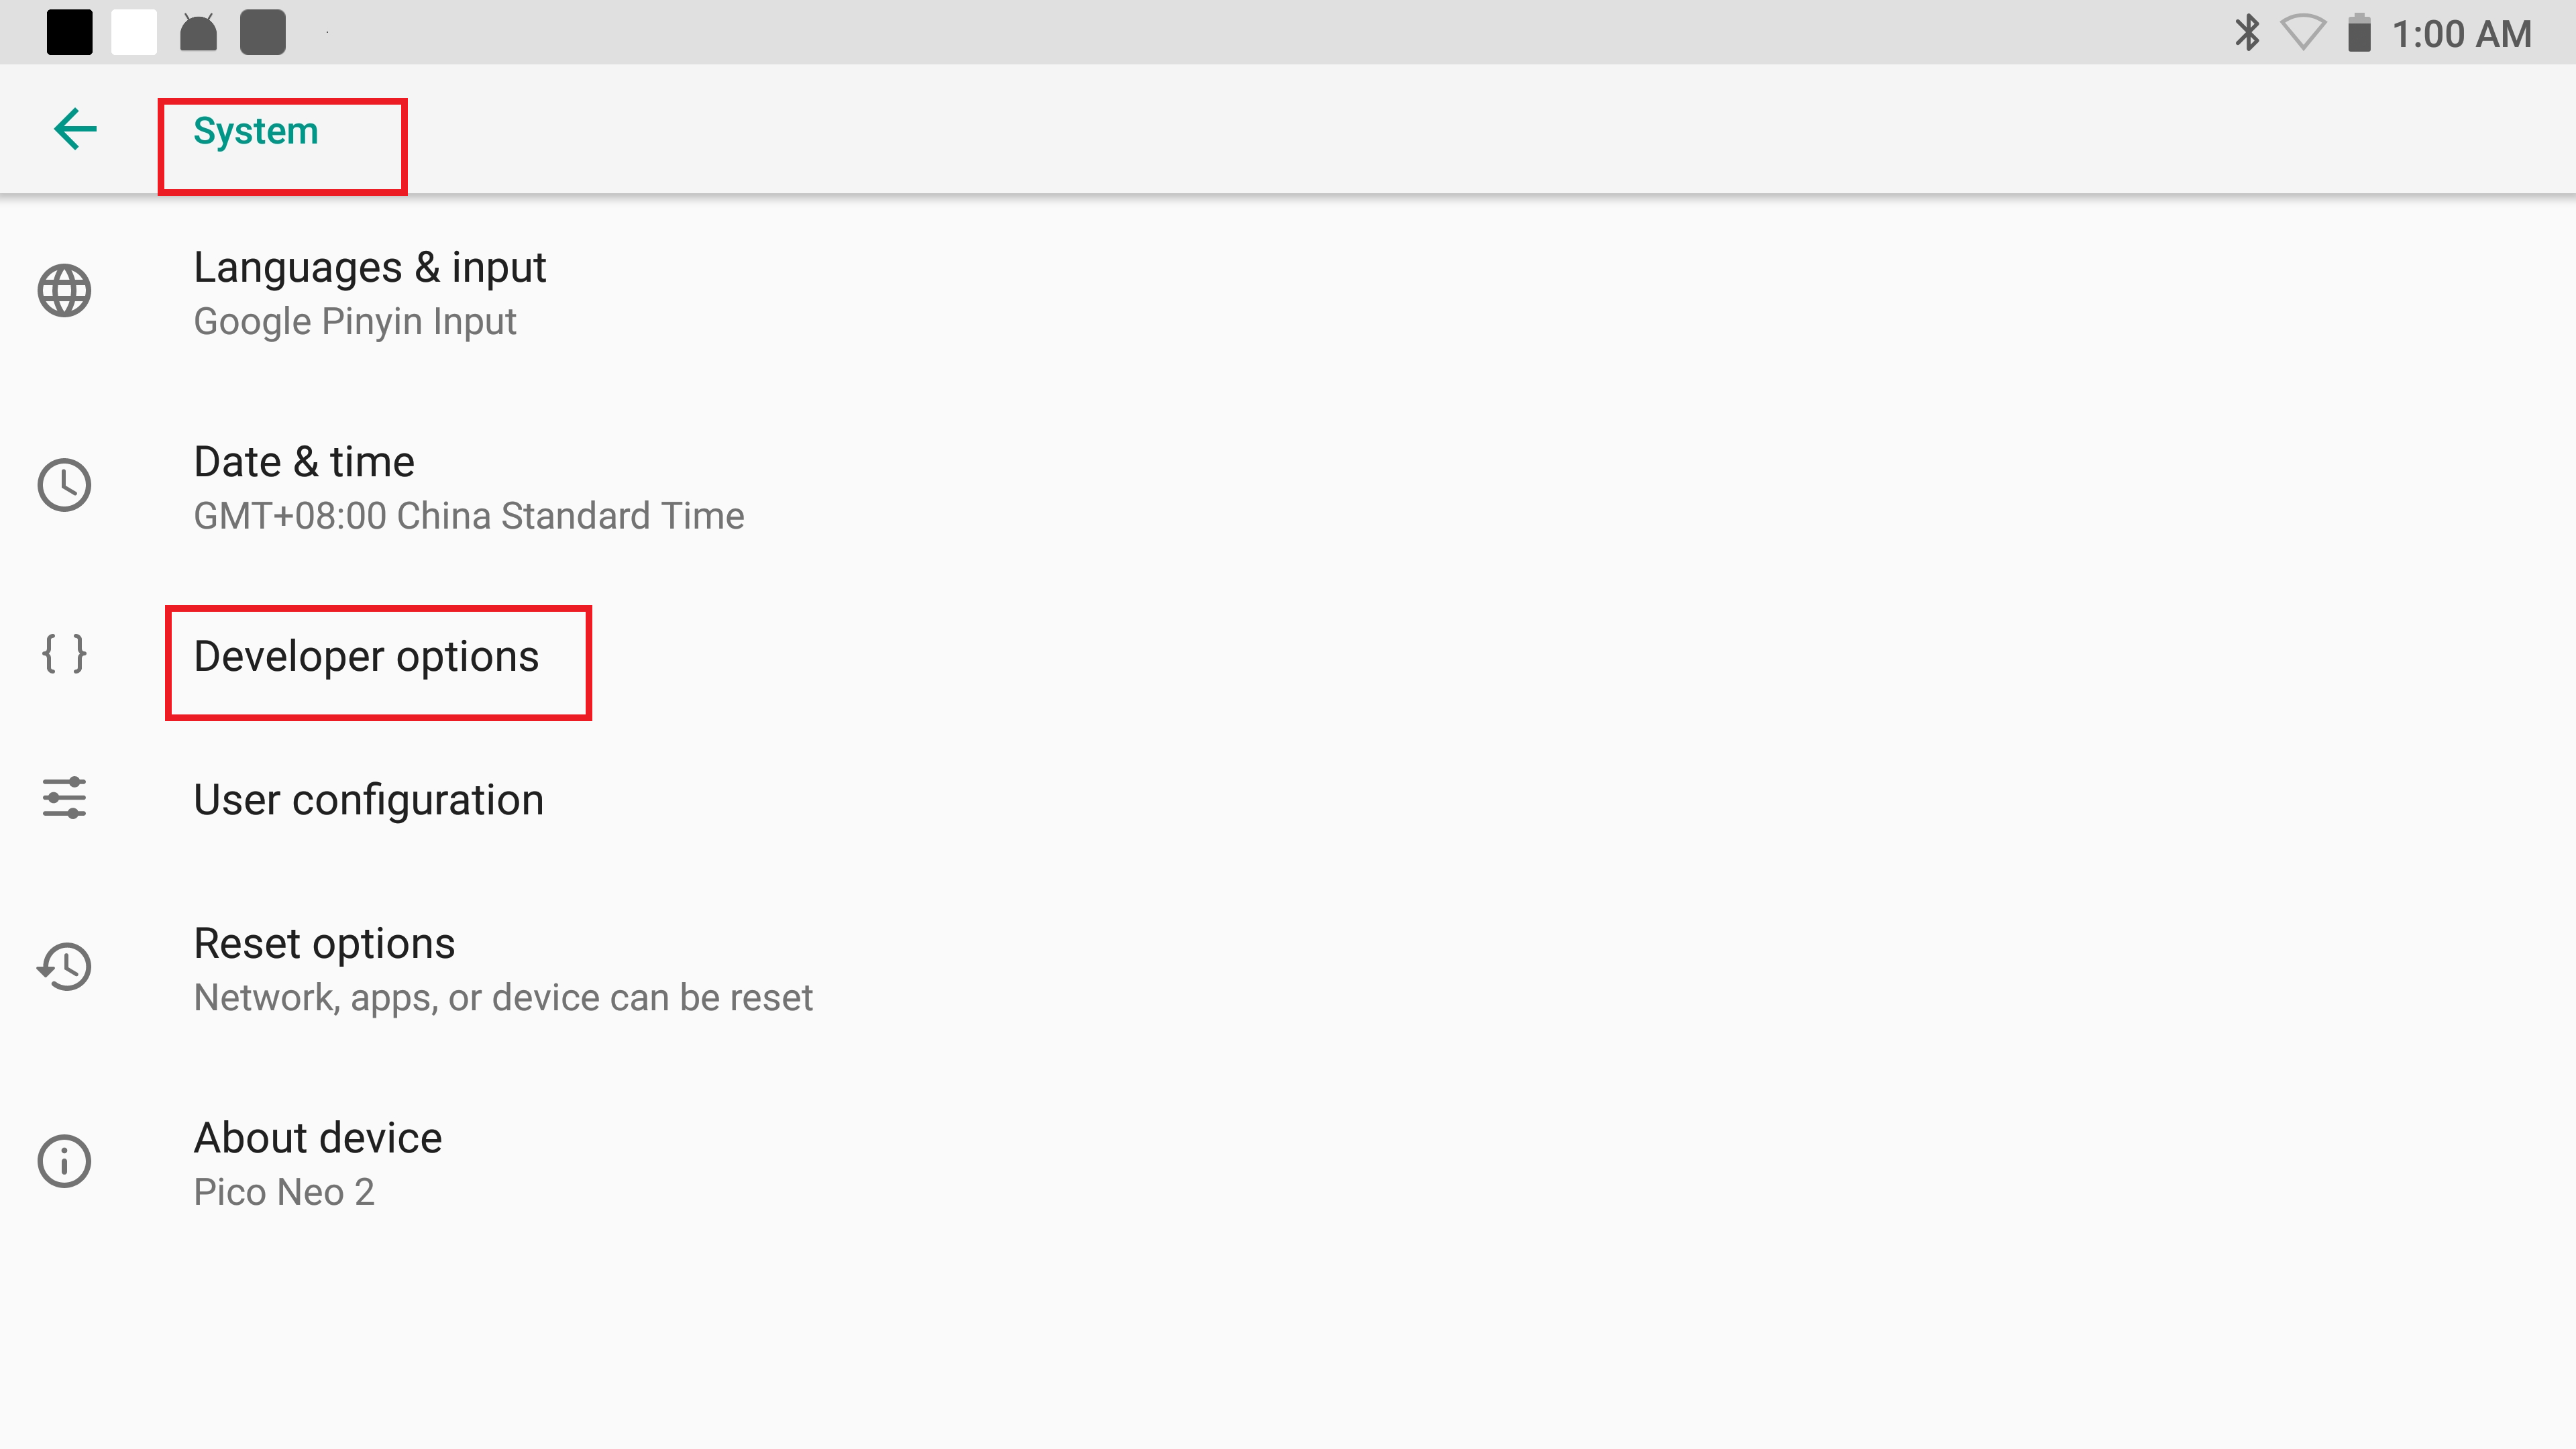
3. In “About device”, click “PUI Version”for at least 8 times and then go back to “System” page. Now you can see Developer Options appear.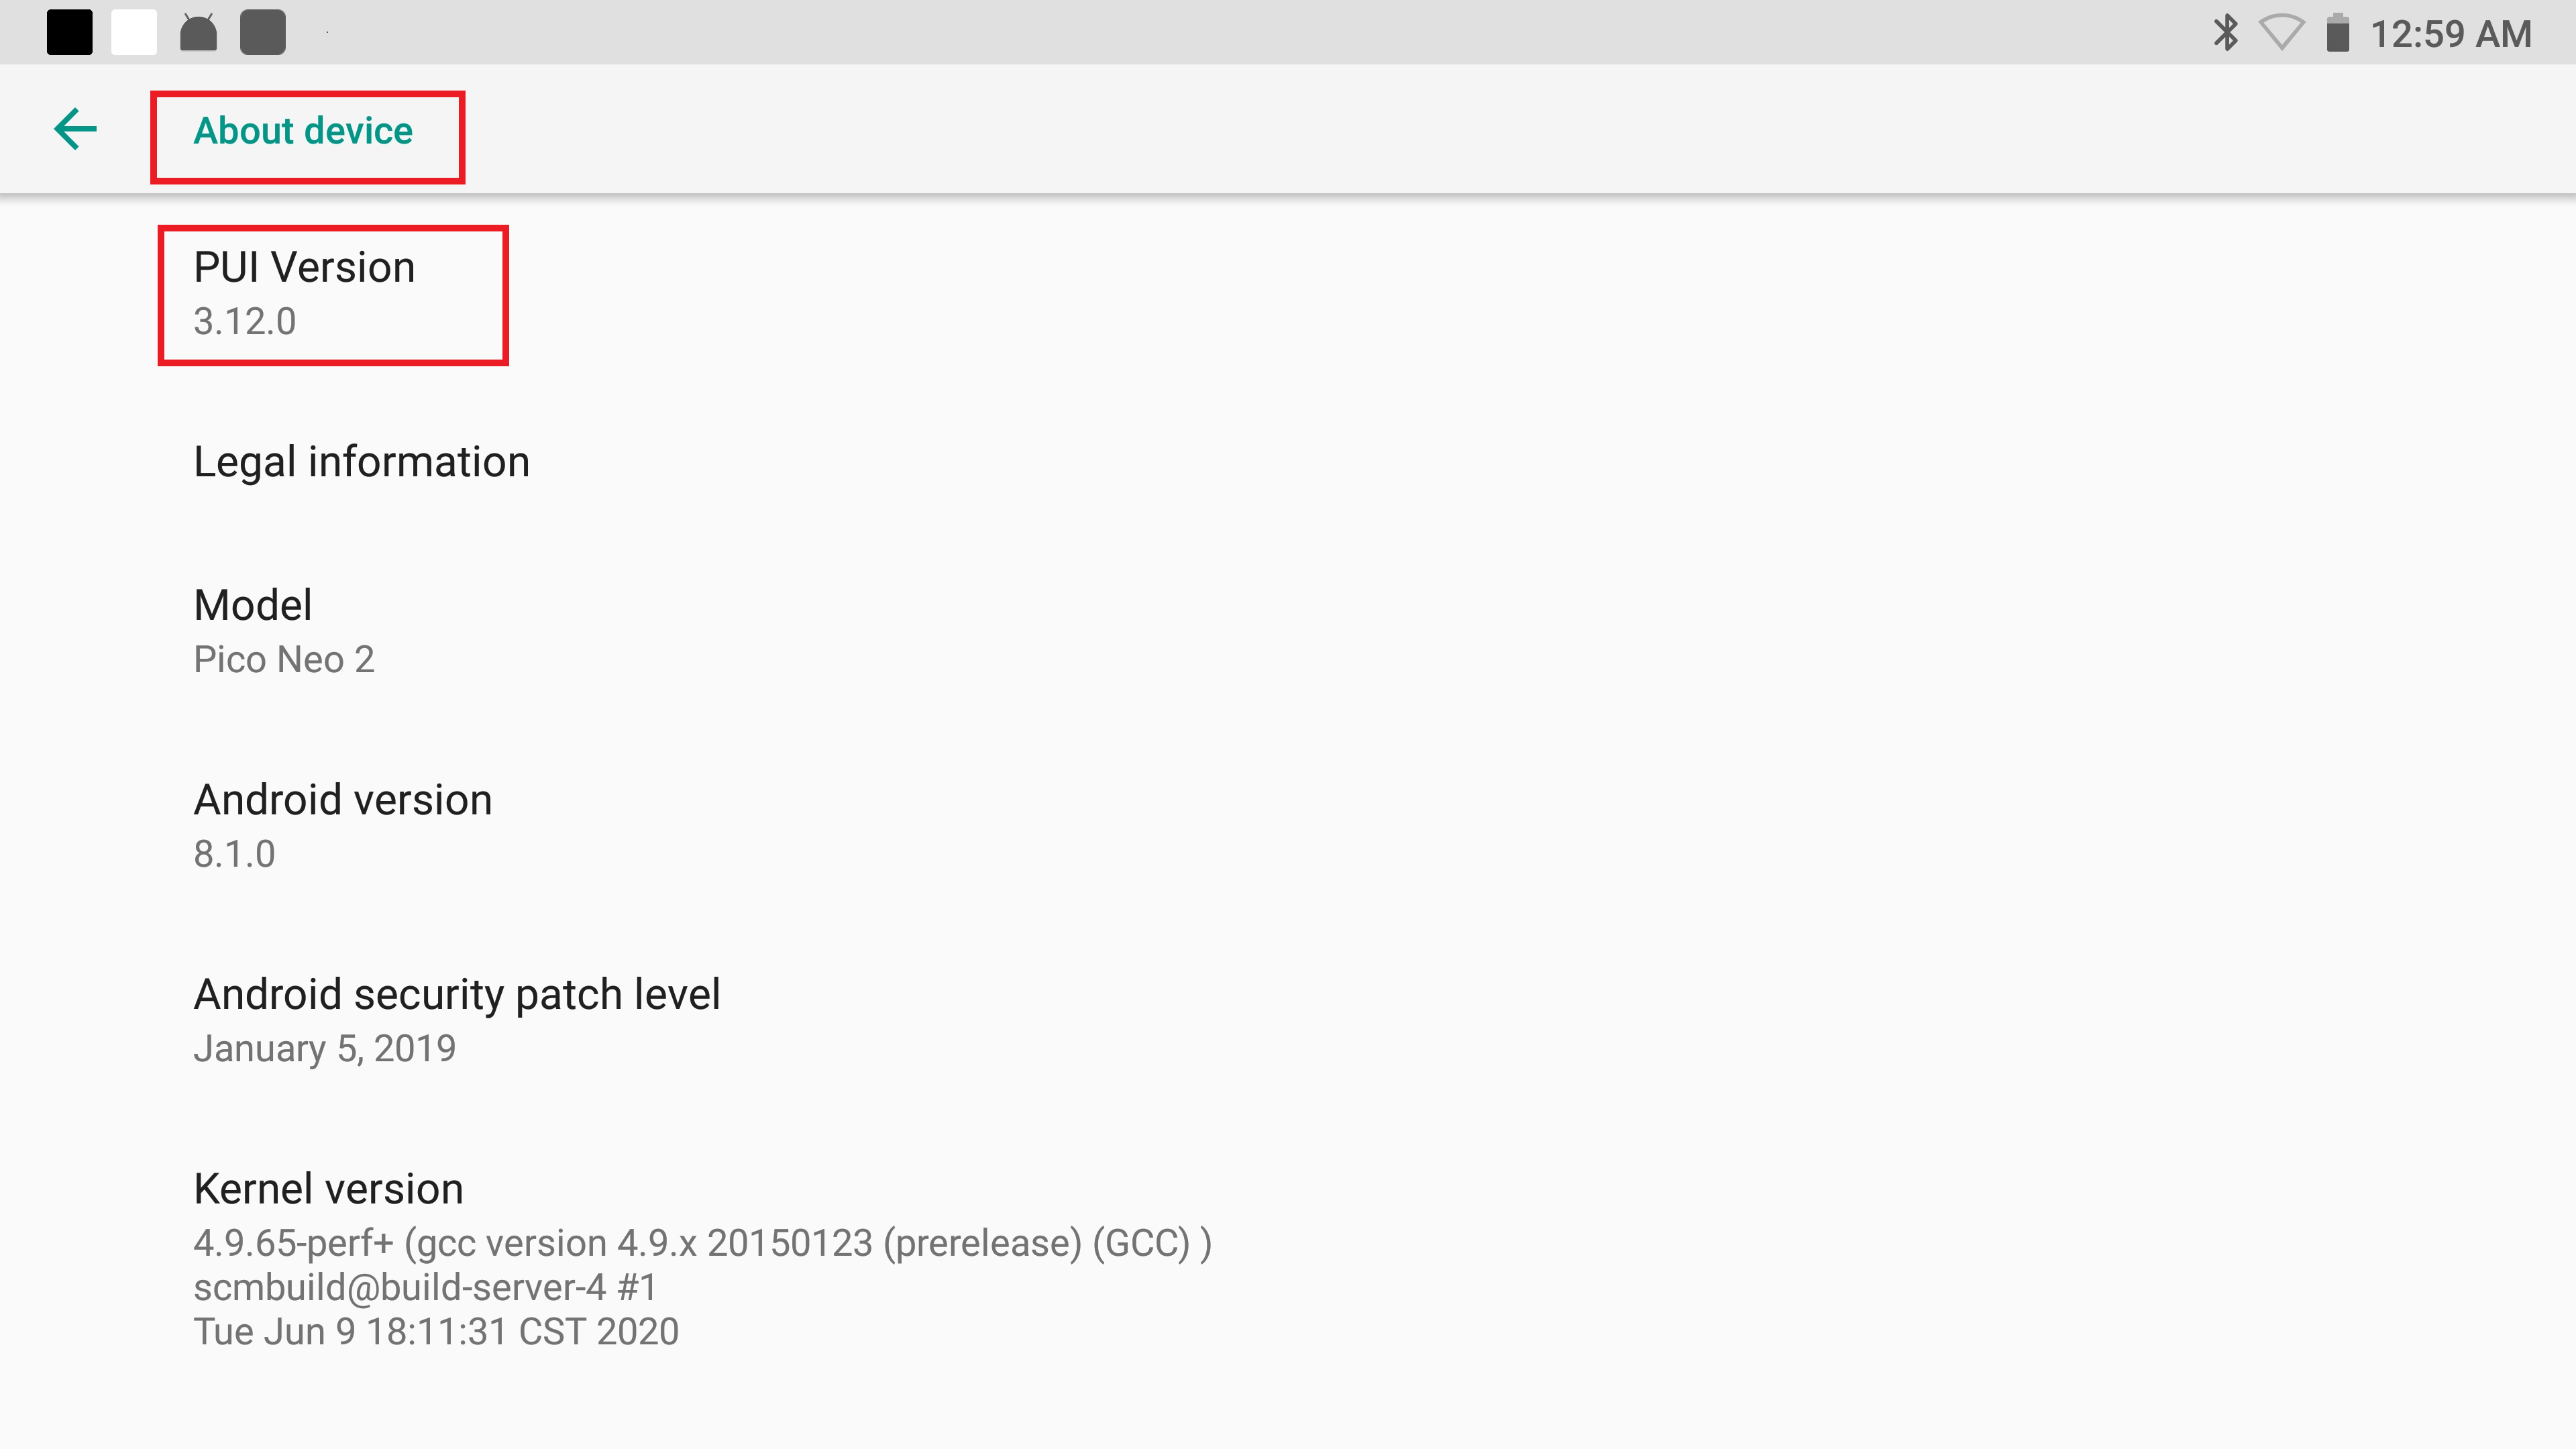
Q2: How to enable USB Debugging?
A:
1. Enter developer options (refer to Q1), enable ” USB debugging”.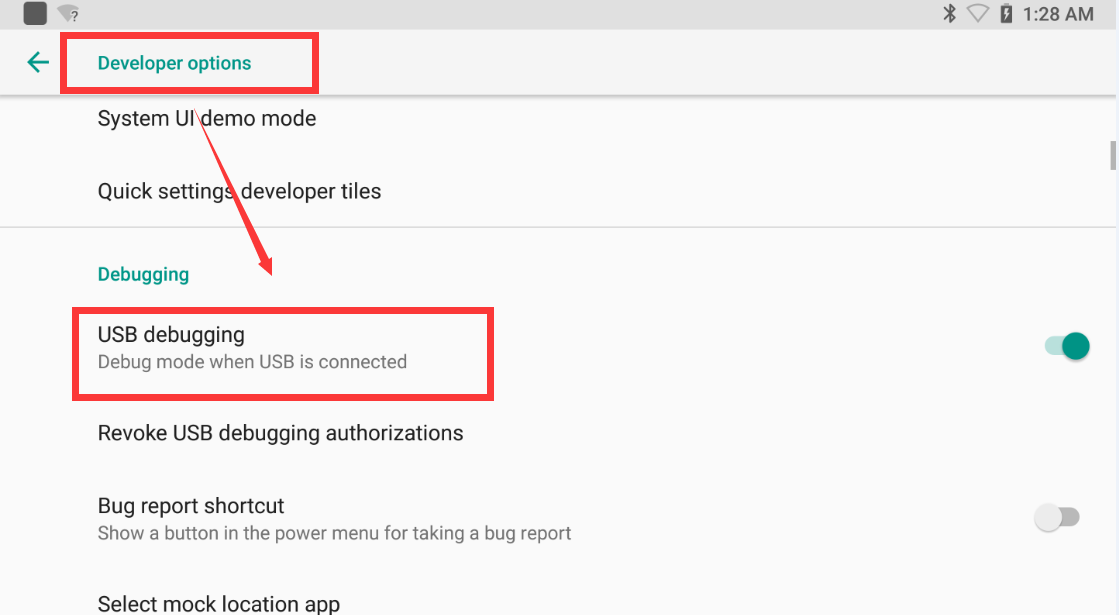
2. Find “Select USB Configuration” under “Networking” category. Set to “MTP (Media Transfer Protocol)”.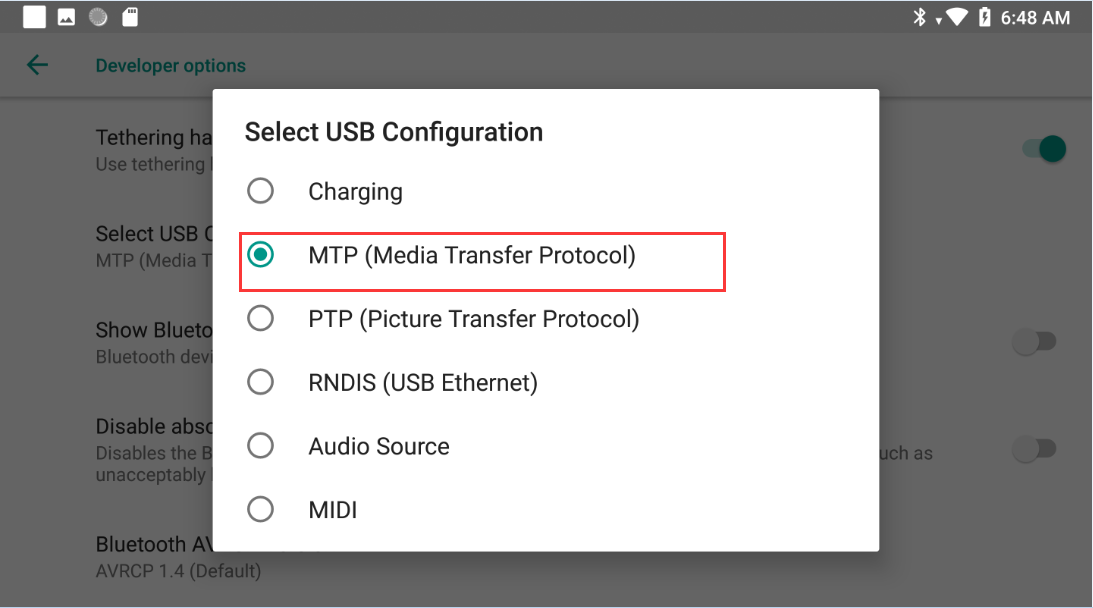
Q3: Frequently used shortcut keys.
A:
Clear background processes: Double click “Home” button to shut down background processes.
Screenshot: Long press “Power” plus “Volume Down” buttons to take a screenshot.
Switch VR/Android mode: Click “Confirm” and “Volume Up” simultaneously to switch between VR and Android native mode.
Q4: What is recommended Video Encoding Formats?
A:
Applied products: G2 /G2 pro / G2 4K/ G2 4KS/G2 4KE/Neo2/Neo2 Eye
Video Encoding Formats:
| Parameter | Recommended | Maximum | ||
| Resolution | 3840*2160 | 3840*3840 | 4096*4096 | 5760*2880 |
| FPS | 60 | 30 | 30 | 30 |
| Bitrate(Mbps) | 40 | 50 | 100 | 100 |
| Decoder Standard | H.264, H.265 | H.264, H.265 | H.265 | H.264 |
Note: For 3D-360 video, recommended resolution is 3840*3840, and maximum resolusion is 4096*4096.
Audio: Support decoding multi-channel, but the output is 2 channel.
For more applicable formats, here is the list of codecs that can be used on the headsets:
Q5: How to enter recovery mode?
A:
Goblin and Pico Neo Recovery Mode:
1. Power off device
2. Long press “HOME + Volume Up” keys at the same time, and then press “Power” key to enter flash mode.
3. When shown “No Command” after seeing an Android robot, long press “Home” key to enter the menu screen as shown in the below figure.
G2 /G2 pro / G2 4K/ G2 4KS/G2 4KE/Neo2/Neo2 Eye Recovery Mode:
1. Hold “Power” + “Volume Up” button for a while, you should be able to see an Android Robot.
2. Hold “Power” button and click “Volume Up” button for once to enter Recovery Mode menu.
Note: Functions of keys in the flash mode: “Volume up” key – Move up; “Volume down” key – Move down; “Confirm” key – Confirm.
Q6: How to do factory reset?
A:
There are three methods to do factory reset: PUI, 2D Settings, Recovery mode
G2/G2 4K/Neo 2:
PUI:
Go to “Setting” – “General” – “Reset”, and select “Factory Reset”
2D Settings:
- Press “Confirm” + “Volume Down” button go to 2D Setting
- Enter “System” – “Reset Options”, choose “Erase all data (factory reset)”
Recovery mode:
- Power off the device.
- Hold “Power” + “Volume Up” button simultaneously for a while, you should be able to see an Android Robot.
- Hold “Power” button and click “Volume Up” button for once to enter Recovery Mode menu.
- Use Volume buttons to move and power button to choose “Wipe data/ Factory reset”
- Confirm and wait for a while, if no error occurs, the device will reboot automatically and work as normal.
Goblin:
PUI:
Go to “Setting” – “General” – “Reset”, and select “Factory Reset”
2D Settings:
- Press “Confirm” + “Volume Down” button go to 2D Setting
- Enter “System” – “Reset”, choose “Reset Phone”
Recovery mode:
- Power off the device.
- Hold “Power” + “Home” + “Volume Up” button simultaneously for a while, you should be able to see an Android Robot.
- Press “Home” button to enter Recovery Mode menu.
- Use Volume buttons to move and power button to choose “Wipe data/ Factory reset”
- Confirm and wait for a while, if no error occurs, the device will reboot automatically and work as normal.
Q7: How to mitigate Chromatic Aberration?
A:
Open “Remove dispersion mode”
1. Go to “Setting”;
1. Go to “Pico Lab”, enable “Remove dispersion mode”.
Q8: How to reset orientation only horizontally?
A:
When using Pico SDK to reset orientation, the default behavior will be a global reset.
If you need to reset only horizontally.
Use adb command: adb shell setprop persist.pvr.reset_mode 0
- Note that this setting works for all applications.
If you need to set back to reset globally: adb shell setprop persist.pvr.reset_mode 1
Q9: How to upgrade system via SD card?
A:
There are two methods:
- Method 1 – Upgrade via PUI :
1. Create the “dload” folder in the SD root directory;
2. Copy the ROM package to the “dload” folder of the SD card (do not decompress the zip package);
3. In “My Applications” → “System Update”, click “Offline Upgrade”.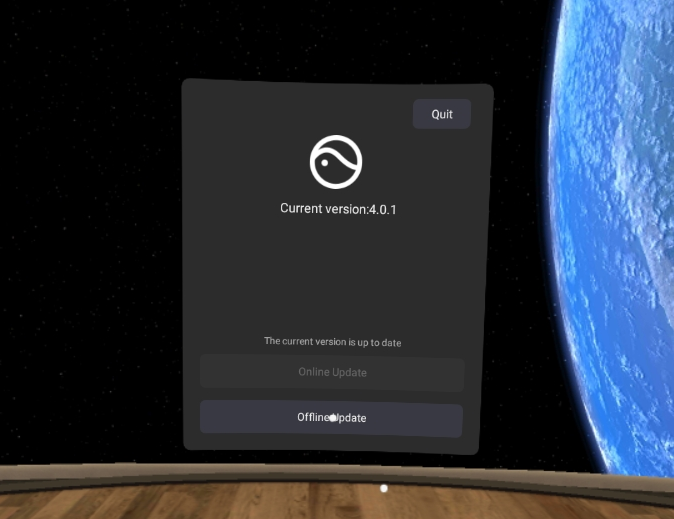
- Method 2 – Upgrade via Recovery Mode:
1. Copy the ROM package to root folder of the SD card (do not decompress the zip package).
2. Enter the Recovery mode (refer Q6 step a, b, c).
3. Select “Apply update from SD card”, and confirm.
4. Select the ROM package previously copying the SD card. Installation will take 3-5 minutes. No operation during this period.
5. Select “Wipe data/factory reset to” to erase existing data.
Notes:
1. One SD Card in the FAT32 format (the SD card memory should be higher than 2G, to the maximum of 256G);
2. The remaining battery should be more than 40% during upgrading and the upgrading process lasts for 3 to 5 minutes.
3. System can be upgraded only from a low version to a high version.
Q10: How to cast screen to a TV/TV box?
A:
To cast screen, please make sure your TV/TV box supports Miracast. Also, cast content from headset to Miracast enabled Android mobile phone is feasible. To find Miracast compatibe devices, please refer to Wi-Fi Alliance product finder: https://www.wi-fi.org/miracast-products
1. Find Miracast application on TV/TV box, and make sure the application to start scanning.
2. Double click “Home” button on headset to pop up shortcut panel
3. Click the “Screencast” button.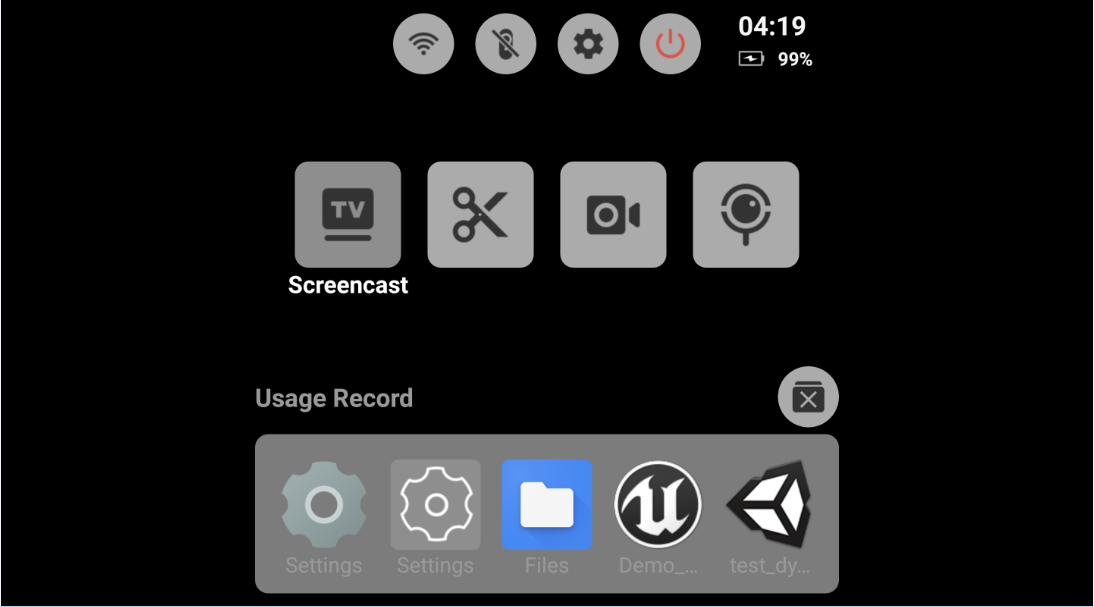
4. Choose projection device from the list.
Note:If you need to project monocular view, please enter the 2D Settings, find “Connected devices” and click to enter, make sure the “Single-eyed Display” is enabled.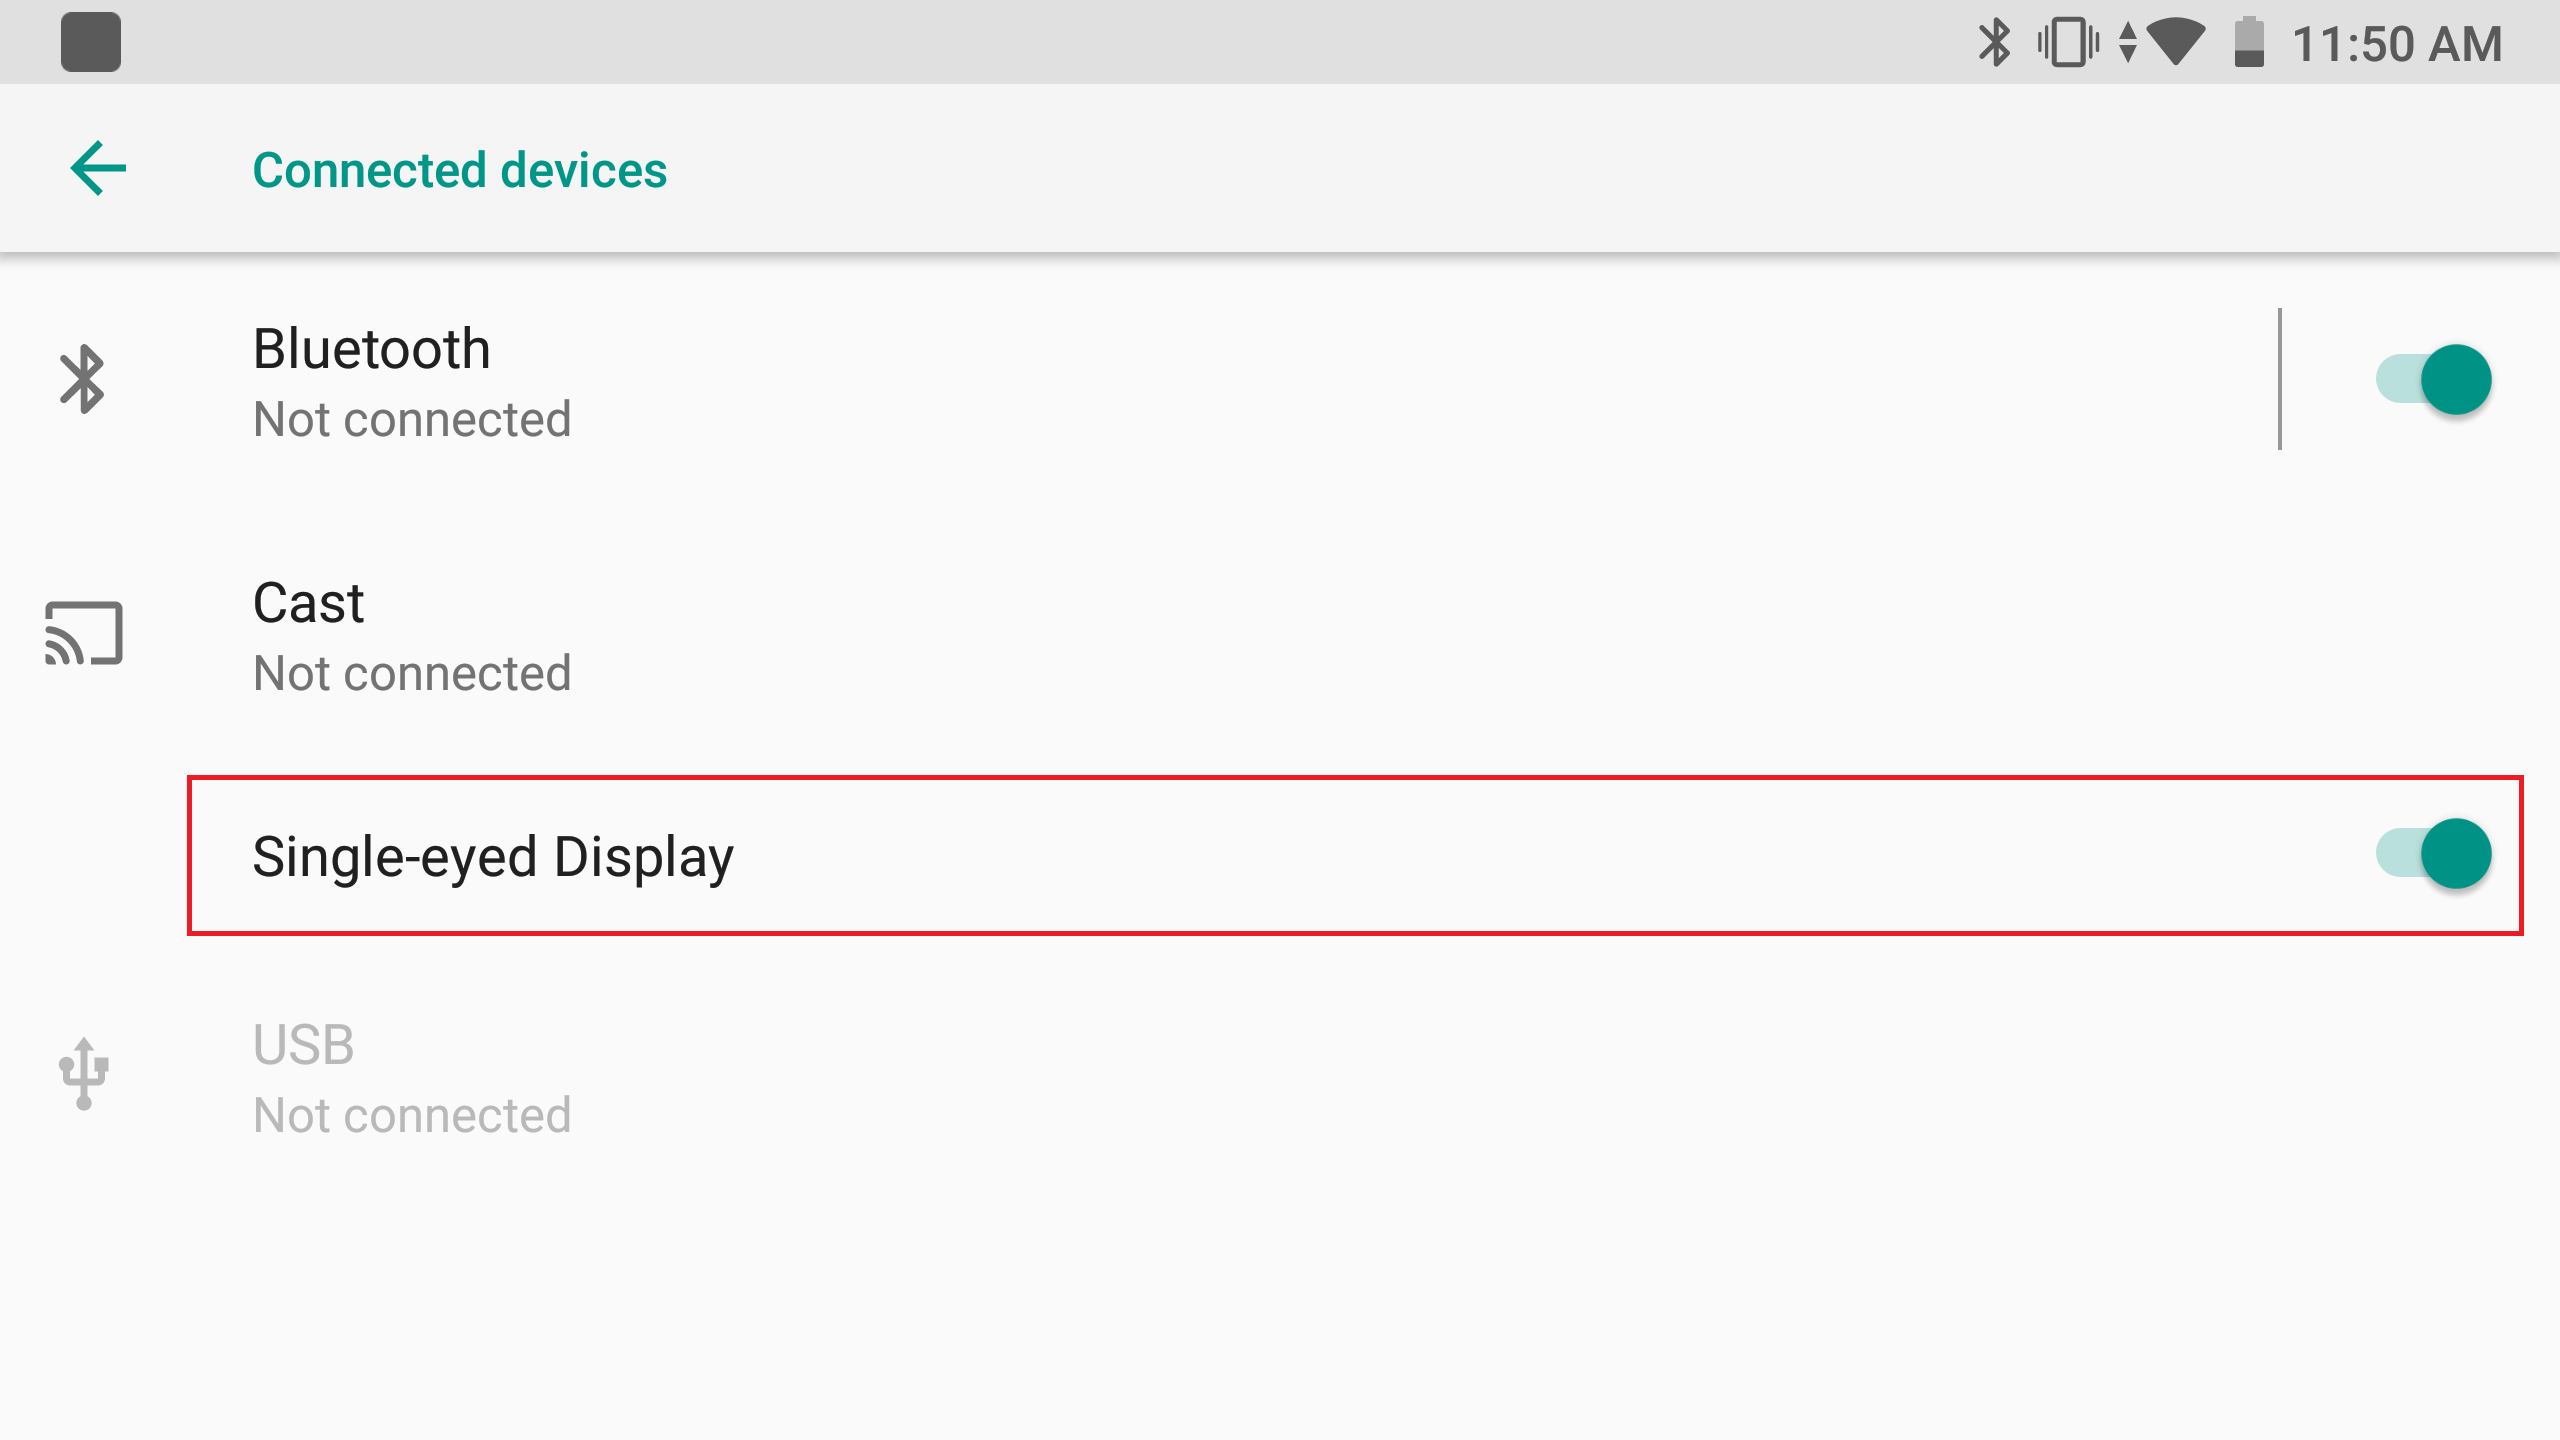
Q11: How to format SD card as internal storage?
A:
If you want to copy a large file (>4GB) or install apps on SD card, follow the steps below:
1. Long press “Confirm” and “Volume-” keys to enter the 2D Settings;
2. Find “Storage”, and click to enter
3. Find “SD Card”, and click to enter
4. Click option icon on top right, and find “Storage Settings”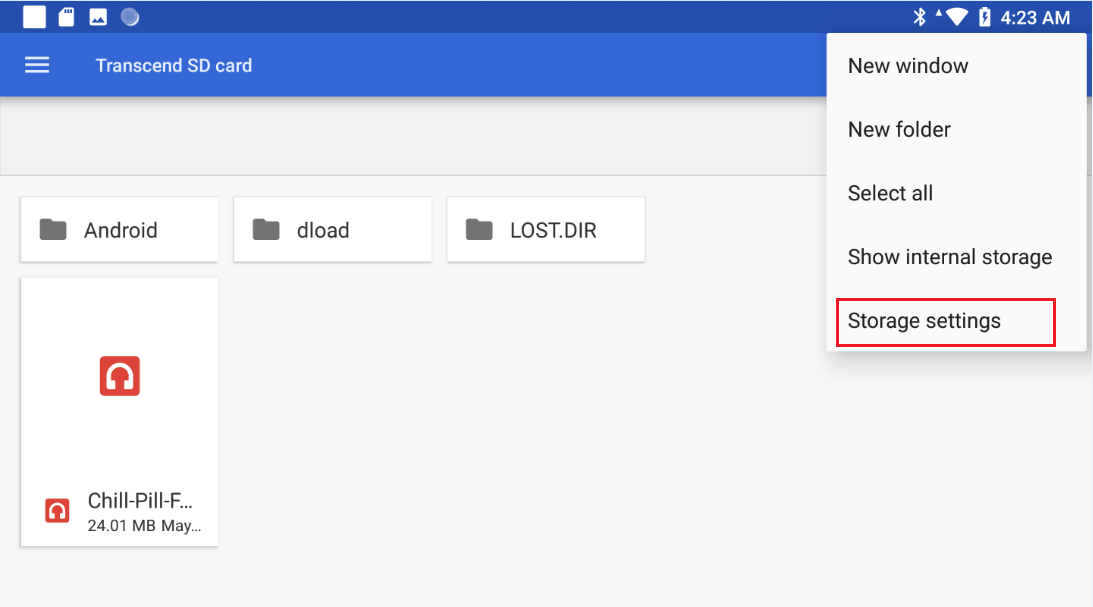
5. Select “Format as Internal” in pop-up menu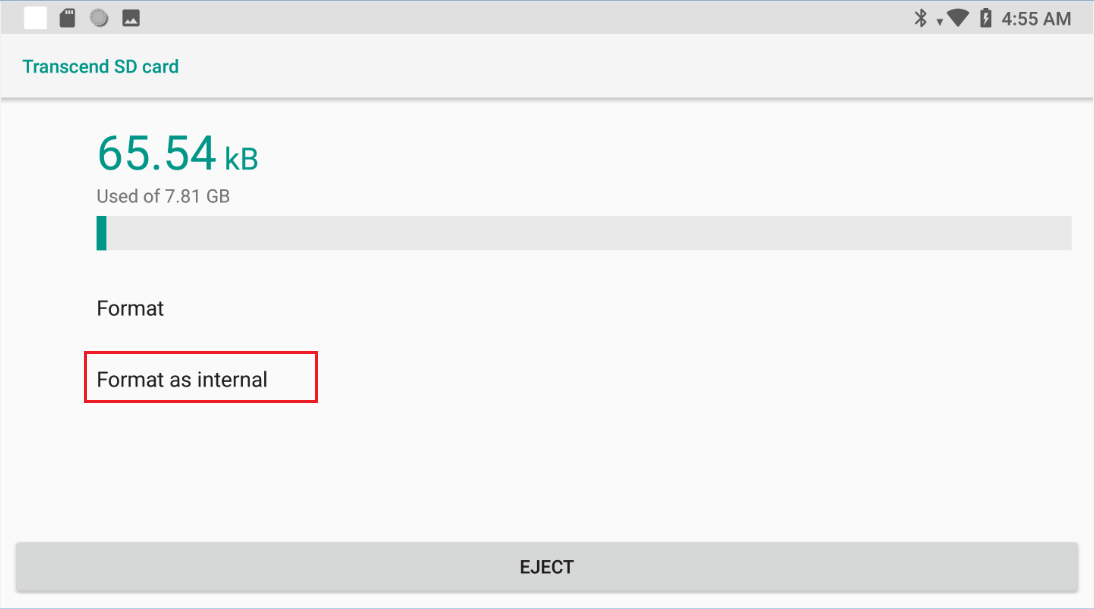
Q12: How to turn off sleep mode?
A:
1. Find “Screen Off Timeout” and “System Sleep Timeout” under “Power Policy”, set to “Never”.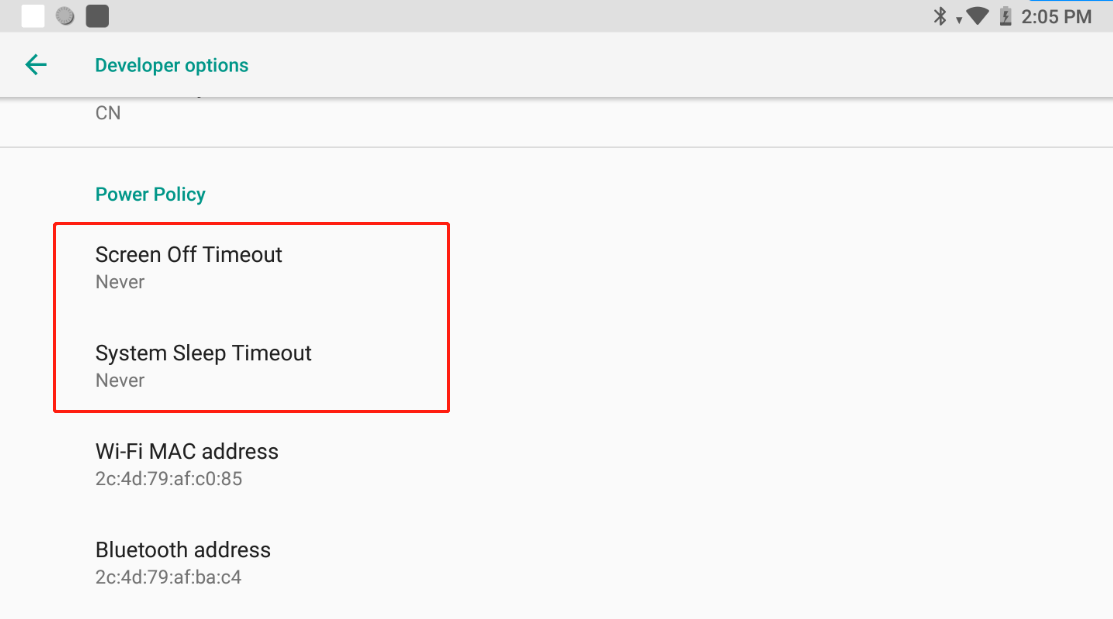
2. Disable the “auto sleep mode” under “Special Settings”.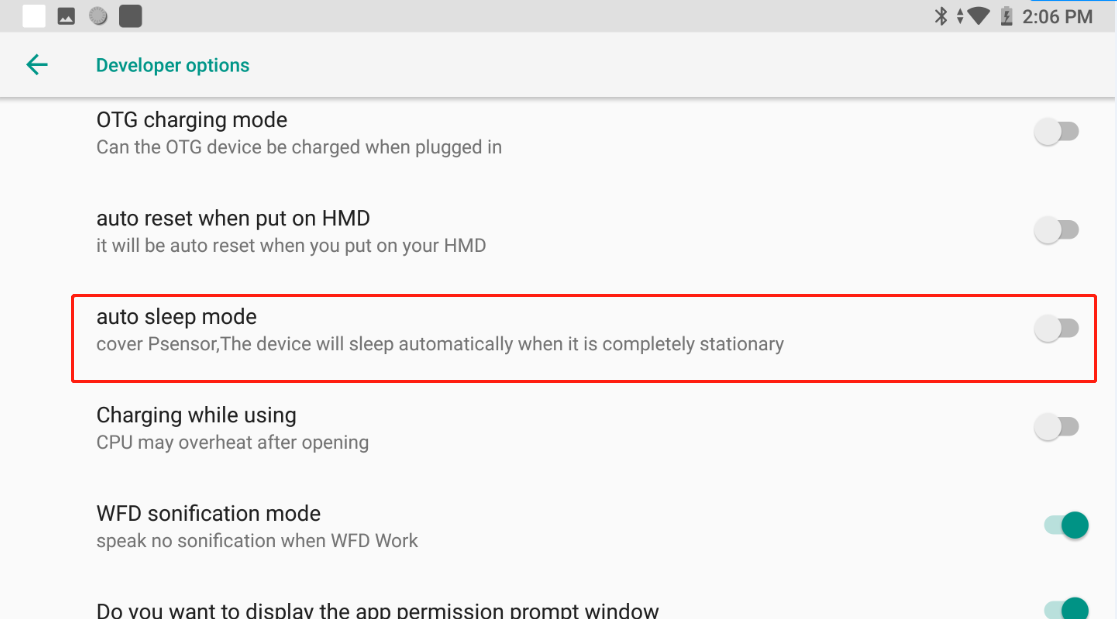
Q13: How to mitigate HMD overheating?
A:
If you are a Unity developer, please perform the following steps:
1. Check the current frame rate on VR application.
To turn on real-time display of frame rate using Pvr_UnitySDK, follow the instructions in Display frame rate.
You can also set this on the device. Go to 2D settings -> System -> User configuration. Under Special Settings, turn on Info of the VR frame rate.
Launch your VR application, you can now see the real-time frame rate displaying in the view. If the frame rate is higher than 72 FPS, perform Step 2.
2. Limit the frame rate in the Inspector panel of Pvr_UnitySDK.
3. You may also configure the size of EyeBuffer by modifying the parameters of **RT size**(a recommended RT size is 1216*1344).
4. Then, enable Foveated Rendering. Setting the Foveation Level to High is recommended.
If you are an Unreal developer, please perform the following steps:
1. Configure EyeBuffer size by modifying the parameters of RT size (a recommended RT size is 1216*1344).
2. Enable Foveated Rendering. Setting the Foveation Level to High is recommended.
Q14: How to sign apk with Pico system signature?
Here are the steps to sign the app with Pico Online Tool:
- Step1: Apply for an accountPlease contact Pico technician for account and password.
- Step2: Login Signature SystemOpen Pico online signature system ( http://ussign.picovr.com/login ), enter account and password to login. You will see “Signature List” after successful login.

- Step3: Upload Signature ApplicationClick on “Upload File”, enter the upload file interface; Click “Select File” to select the application to be signed;
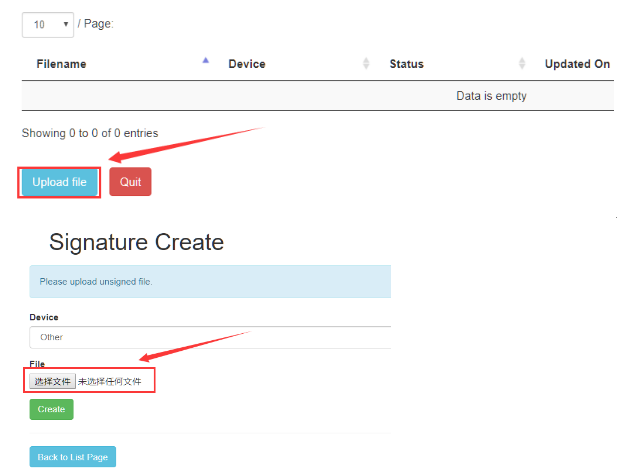
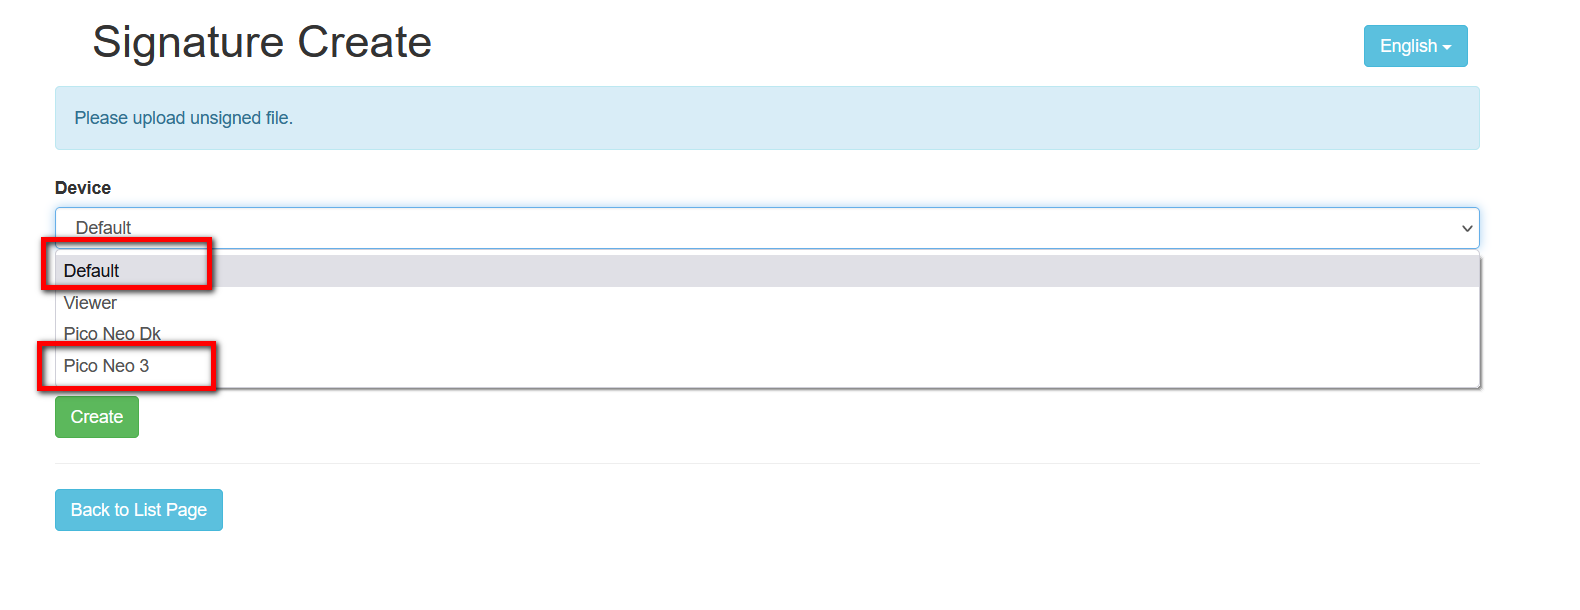
- Step4: Select Device TypeSelect “Other” then click “Create” button;
- Step5: View Signature ResultsClick “Back to list page”
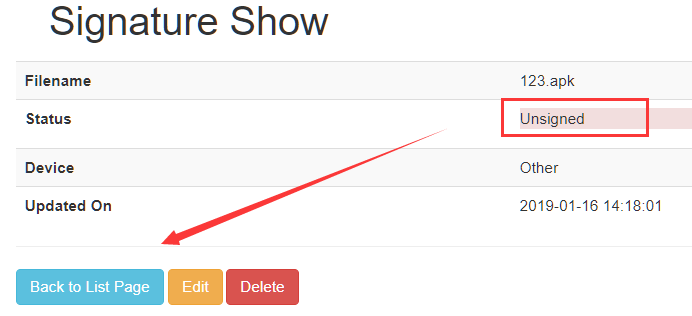
On the list page you can see the uploaded APK, and the status here is unsigned.
- Step6: Get Signed APKNormally in 5-10 minute system will complete signature automatically. Refresh list page, you can see the application signature status is “signed”. Clicks”signed” to download signed APK.

© Copyright 2015-2019 Pico Technology Co., Ltd. All Rights Reserved.Built with Sphinx using a theme provided by Read the Docs.