


The introduction of the plugin set of 360 tools by Mettle, named SkyBox, has been a savior to 360 content creators worldwide. Yes, everything that the plugins do can be done manually, but you could also build a house using a rock instead of a hammer. The real question becomes, Why would you?

In this tutorial, I am going to show you how to eliminate the nadir in a 360 video. I will use Mettle Skybox and Adobe After Effects. You can achieve similar results with other software but this is my personal preference. If you have the zxp installer on your pc or any other type of plugin, you can still do this, it’s just the layout of the software and whatnot will vary but tools will be similar.
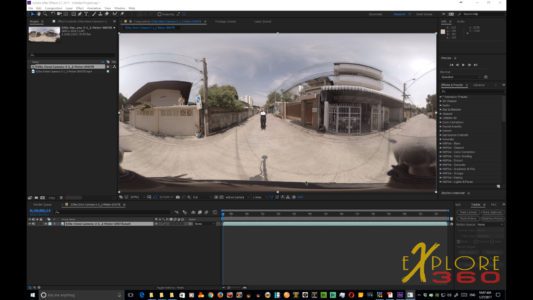
First I will drag and drop my clip into After Effects. From there, I drag it into the “new composition” icon which will create the working Comp. As you can see in the preview window my rig is sitting at the bottom, or nadir, in the video.
Scrolling down through the “Effects & Presets” I will open the “Mettle” folder and drag the Mettle SkyBox Converter and drop it onto the 360 video clip.
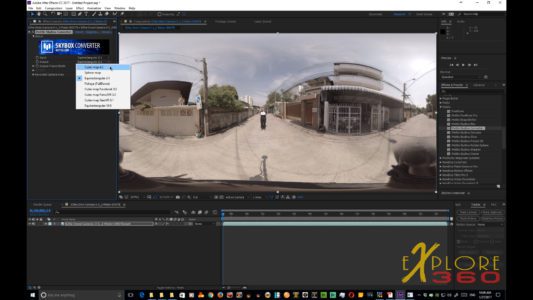
That brings up the effects panel, and you want to change the output of the effect from Equirectangular 2:1 to Cube-Map 4:3.

This, in effect, cuts up your 360 video into six images. Four across and one above and below. This lays out looking somewhat like a sideways cross.
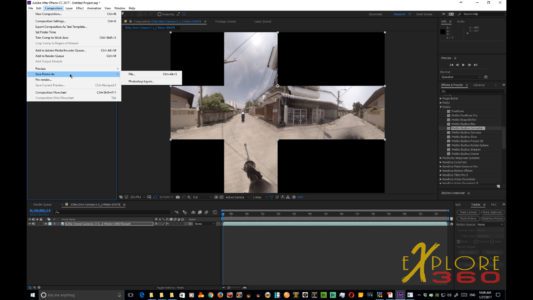
Go to the top menu bar and click on “Composition.”. In the drop down menu, you will see “Save Frame As.” and next to that “File.” Clicking on “File.” will send the image on the screen to the “Render Queue.” Be sure that you output at full size and best settings. Direct the file to a folder in your Project folder, named “Photoshop.” Then select “Render.” This will create the .psd file.
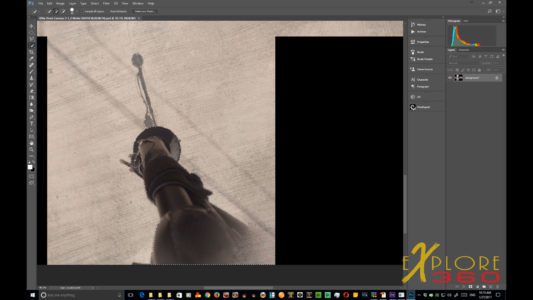
Opening Photoshop is next. Here we will import the PSD file that was just created. The best step is to zoom in so that the area that you need to replace is nice and big, making it easy to work with.
Using the “quick selection” tool. I will outline the area that I want to replace. I adjust the size of the tool to highlight the area as needed.

There are several tools we could use next, but I am going to use the “Fill” tool and select “Content Aware.”. That does a pretty good job, but there are some areas that will need more work.
“Deselect.” either by using the menu or “Ctrl-D.”. Then I will use the “Healing” tool to go over and fill in the edges of our outlined area, adjusting the size of the tool as needed.
To finish it off nicely, I use the “Clone” tool. With this tool and some care, I can replace the shadow of the rig. For this example, I am doing a very quick job to illustrate the technique.

There is one more area in the image that needs some work. And again, I first use the “quick selection tool” and then use the “clone” tool to fix the area.
Finally, when I have it the way that I like I am ready to do a “Save As” for the image. To avoid confusion and in case I need to go back for something that I might have missed, I add an “a” to the name of the file.

Back over to After Effects to import the PSD file and drag it down to lay it on top of the video. Next, using the “Pen” tool, we create a “Mask” so that just the areas we fixed will be seen and the rest of the video can play naturally. In this case, I will create two masks for the two areas that I did corrections. After sketching out the area with the “pen.” tool, make adjustments to the mask to properly cover the area. Then open the controls of the Mask and expand both the “Feather” and the “Mask Expansion.” to make a smooth blend between the photoshopped area and the video.
When that is complete select the “composition” that you are working on and drag that into the “new comp” icon to create another composition. Once again, I drag the Mettle SkyBox Converter onto the video in the comp and the plugin automatically creates a new corrected equirectangular 360 video.

As you can see the rig is gone and the image looks clean and beautiful.

From there the last step in the process is to output the video using Adobe Media Encoder which adds the necessary 360 metadata to the video.

There are several methods for replacing the rig and depending upon what you video is, one method may be easier or work better than another. It is certainly nice to have so many options.